Category Archives: Woodworking

Pen and Letter Open Sets

Finally finished the Pen and Letter Opener gift sets. I even sprang for the — let’s call it “leather” — gift case, because they’re just that classy. Like me. Classier, even… These are available for purchase via my Etsy store (links below). Owen Sound locals, just chat me up, obviously no need to pay shipping!

There’s the one set in Lacewood I posted yesterday, plus now two in Bubinga, and two in Stinkwood. Which I promise does not stink and is in fact rather awesome… Five sets only. Great for gifts! Act now!

Cigar Style Pen + Opener - Stinkwood
African Stinkwood Pen and Letter Opener, with case.
Buy on Etsy:
www.etsy.com/listing/61456262/pen-and-letter-opener-set

Cigar Style Pen + Opener - Bubinga
African Bubinga Pen and Letter Opener, with case.
Buy on Etsy:
www.etsy.com/listing/61455857/pen-and-letter-opener-set

"Cigar" Style Pen + Letter Opener - Lacewood
Australian Lacewood (Silky Oak) Pen and Letter Opener, with case.
Buy on Etsy:
www.etsy.com/listing/61359728/pen-and-letter-opener-set

Mason Jar Cedar Vase

Continuing the octagon theme we have going on here at Barkwhistle, and continuing also to look for ways to use up some cedar scraps, I recently mitred together some small boards to make this small planter. Then I decided to try something a little bit different… instead of straight boring old miters, I though I would use one of these birds mouth router bits from Lee Valley Tools.

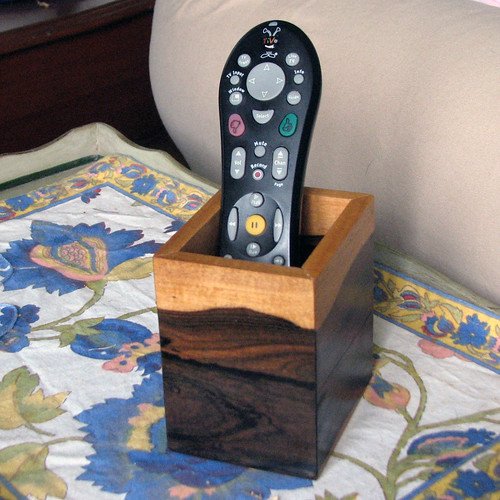
I showed the results of my first attempt to my wife, and she immediately declared that it would be a vase. It won’t hold water, says I. Well, maybe it will hold a mason jar, says she. And lo and behold, a perfect fit.

So here, just to amuse my own self, and/or in case somebody finds it useful, is a bit of an illustrated step-by-step description of how I built our second Mason Jar Cedar Vase.

1. Mill the pieces. I milled 8 pieces of Western Red Cedar, 2 1/4″ x 9″ x about an inch thick. It’s usually easier to work with longer pieces and cut them to final length, especially if you need to run them through the thickness planer, which would not be possible with pieces this length.

Milled pieces, ready for routing.

2. Rout the Bird’s Mouth. Using the “Birdsmouth 8” router bit (Lee Valley item number 16J40.58), and set up in a router table as shown, using a featherboard to ensure an even cut, I routed the bird’s mouth on one edge of each piece.

Birds mouth router bit set up.

You can start to see how they will nest together. Pretty cool…

Birds mouth joints.

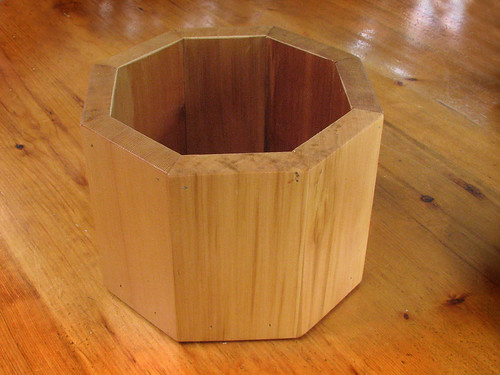
3. Dry-fit and tape together. Stand all the pieces on end and assemble the cylinder. Use your blue tape to tape the assembly together as snugly as possible. If the routing went well and the pieces were square to start with, it should magically come together beautifully.

Dry assemply.

You’ll notice in the photo above that the assembly is sitting on another piece of cedar. This piece will form the bottom of the vase.

At this point I went ahead and glued up the cylinder, trying to use just the right amount of glue to prevent squeeze-out. Again I used the blue tape to pull everything together. Didn’t use clamps, although I suppose I could have got out the band clamp. The masking tape can be pulled taut enough to get a good glue bond, I think.

4. Trace the bottom of the vase. You’ll need a wide enough piece of cedar to completely span the opening of the cylinder. Hold the cylinder firmly down on this piece, and reach down inside the assembly to draw a pencil line marking the inside octagon shape.

Trace the bottom.

5. Cut out the bottom. I used the bandsaw to cut along the pencil lines to create the octagon-shaped bottom of the vase. I left the line showing, then used the disc sander to sneak up on the final fit. Being cedar, you could just as easily use a sanding block for the fine tuning.

Cut the bottom.

6. Install the bottom. If you get really lucky, you might find that you have such a perfect fit that glue alone will hold the bottom in place. I wasn’t so lucky, and in any event, I decided that it needed something mechanical to hold it securely enough to be safe. So I countersunk and counter-bored four holes, and installed four 1 1/4″ brass screws to hold the bottom firmly in place.

Install the bottom.

7. Final Sanding. When the glue has dried, I went ahead with the final sanding and shaping of the cylinder. You have a couple of choices here. Depending on the original thickness of the pieces, and the position of the router bit, there will be groove between each slat of the cylinder. You can either plane and sand this groove away completely, forming a round cylinder, or just “touch it up” a little, and leave the groove as a feature. I left it groovy on the first one, but decided to sand it to form more rounded transitions on the second one, eliminating the groove, but still maintaining the octagon shape.

Final sanding.

Note: Before finishing, I opted to pop a 1 1/4″ brad nail into each joint, around the top of the vase, just as a backup. This does leave a small dimple in the wood, so you may want to just rely on the glue joint if that’s a problem for you.

8. Apply finishing. I chose to apply a couple of coats of spar varnish, since I liked how it looked on the chairs I made. The first coat was diluted 50-50 with turpentine to enable good penetration, the second coat was applied full strength. Here’s a photo of the first model, the prototype, with its finish almost dry.

Varnished.

And that’s all there is to it. Just drop in a one-quart mason jar, a little water, and the vegetation of your choice!

(photo coming later, when the varnish dries…)

My Dust Collection (A Cautionary Tale)


My Dust Collection, originally uploaded by rgdaniel.

Call me naive (go ahead, I’ll wait) but I always thought “dust collection” meant having a lovely collection of dust. For woodworkers, this is fairly easy to accomplish. And this particular dust collection is archeologically, or maybe geologically, quite interesting. It’s like examining the strata of an exposed canyon wall, to learn what has happened in the past, and in what sequence. In this case, the interior of my Delta X5 Jointer reveals the history of my surfacing several species of wood, notably cedar, maple, walnut, cherry, and purpleheart.

Seriously, it seems that even with a big-ass dust collector in use, you still have to periodically clear out the insides of your woodworking machines… who knew?

Octo Pieces

We have kind of an "Octo" theme going in our house. There is a small octagonal stained glass window above the front door, I built some large octagonal planters a while back, and one of our gardens is octagonally bordered, so here’s a couple more on that theme.


Octo Cheese Board, originally uploaded by rgdaniel.

The octo cheese board matches the larger laminated breadboard I did recently, and is actually buy phentermine hydrochloride 37.5mg online left over from the laminated top for a matching bread box that is in progress.


Octo Planter, originally uploaded by rgdaniel.

The small octo planter, really an octo flower pot, was to use up some red cedar from the Muskoka Chairs… and still a few pieces left, so I may do one or two more of these…

Big Stripey Boards

This is a new (to me) design for a cutting board, and I REALLY like how it turned out… it’s about an inch and an eighth thick, or 9/8 as we drummers like to say, and made of four species of wood… it has little rubber feet as it’s intended to sit out on the counter, and the feet help keep its bottom dry… there’s also a pair of recessed finger grooves to make it easier to grab hold of… and the edges are all chamfered…


Big Stripey Boards, originally uploaded by rgdaniel.

I made two boards from the same lamination: I basically made a two-foot cutting board and then cut it in half before adding the final details… the design is based on an article on Fine Woodworking’s website (although the two-boards-at-once part was my idea)…


Big Stripey Boards, originally uploaded by rgdaniel.

One of these is going in our kitchen as soon as I finish typing this… the other is looking for a home, so don’t be shy… B-)


The Kitchen Collection

The Kitchen Collection, originally uploaded by rgdaniel.

Here are four recent wood turnings; two pizza cutters (both made of Pau Ferro) and two cheese slicers (one Pau Ferro, the other in Black and White Ebony).

Unless I find a Canadian source for the hardware kits, these will probably be the only ones of these I build, so enjoy! And do speak up if you’d like one for your very own.

Click to view larger size.

Two Custom Slimline Pens


Two Custom Slimline Pens, originally uploaded by rgdaniel.

Two recent custom designs using the Slimline-style hardware in a Satin Nickel finish. On the left, Paduak with a Maple centre band and a Maple Celtic knot in the upper section. On the right, buy soma saga Kingwood with a Cherry centre band.

I may not put these up on the Etsy store, there’s lots up there already, but do let me know if you’re interested. Everything I do is for sale. Dogs need kibble… B-)

Four Rollerball Pens


Four Rollerball Pens, originally uploaded by rgdaniel.

Four Rollerball Pens

Four recent rollerball designs. The rollerball technology gives fountain pen performance and class, with none of the fuss. The upper (cap) sections unscrew, and may be attached to the other end of the pen while writing.

From left to right: (1) Churchill-style, in red palm (contrasting upper and lower stock); (2) Sedona-style in York Gum Burl; (3) Sedona-style in Kingwood; and (4) Baron-style in Bethlehem Olive Wood.

The Baron’s have a neat Celtic knot-style centre band. The Baron and Sedona styles have a threaded receiver for the cap to screw back onto while using the pen. The Churchill employs a friction fit to hold the cap while in use, or it may be set aside. The Churchill is slightly larger than the others.

I may not put these up on the Etsy store, there’s lots up there already, but do let me know if you’re interested. Everything I do is for sale. Daddy needs a new pair of shoes… B-)